
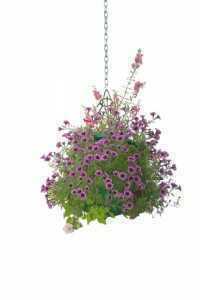
Have you ever gone into a garden center and seen those beautiful hanging baskets that are filled to overflowing with beautiful blooms. I’m sure you have, and I am sure that you have seen the price tag on them. These beautiful baskets can run you up to a hundred dollars, sometimes more and if you are lucky, you will probably end up spending about thirty or forty dollars on the basket.
For new gardeners, those hanging baskets can be a little overwhelming. On one hand, everyone would love to have a hanging basket or two, or three, but for many, that is a big investment to make on a basket. of course, anyone can make a hanging basket for a lower price but as a new gardener, it can be a little daunting and most are left with the certainty that they would never be able to produce the same effects as the garden center.
But that is not true and even new gardeners can create a beautiful hanging basket. All they need to do is follow this step-by-step how-to guide.
What you need:
- Large bucket
- Wire Basket: You can pick these up at craft and garden stores. They don’t have a solid bottom but instead have a wire frame instead.
- Peat Moss: If you don’t want to use peat moss, you can use black plastic instead.
- Potting Soil
- Plants
- Watering Can
- Gardening Gloves: This is important if you are using peat moss but using gardening gloves will protect your hands for all your gardening projects.
Directions:
- Place the hanging basket frame into the large bucket so it is resting on the top. This is to provide you with a workspace so the basket doesn’t shift as you work.
- Take the peat moss and line the bottom and sides of the frame. If you are using the black plastic, simply line the basket with the plastic. Do not trim the excess plastic until later.
- Using the potting soil, fill half of the hanging basket. Make sure that you fix the plastic so it is not bunching at the sides and the bottom. You will want as clean a surface as possible.
- At this point, you can either fill the basket with flowers or you can have planting holes in the sides of your basket. To do the latter, simply cut a small hole in the peat moss or plastic and carefully insert the roots of a plant through the holes. Make sure you pack the soil around the roots to prevent slipping and to ensure the best growth for the plant.
- Once you are done with the side plantings, fill the top of the basket with your plants. You do not need to dig down into the soil to do this, simply arrange the plants and that is it.
- After the plants are in place, take more potting soil and fill in around the plants.
- Pack the potting soil down and bring the level of potting soil to just below the rim of the hanging basket.
- Trim away the excess black plastic so it is even with the rim.
- Repack any of the soil that may have come lose when you were trimming and make sure that the soil is firm around the plants. Add more potting soil if you need to to ensure that the plants are in firm soil.
- Water the hanging basket and then hang it in the place where you would like it to go.
And once you are done, you will see how easy it can be to create your very own hanging baskets. The only problem you will probably have is making too many.